
技術習得のためのワークショップ
Cultivation 03
Processing+Arduino+電球
詳細URL :http://www.project-logue.jp/index.php?ref=workshop-004_max-jp
今回のワークショップでは、オープンソースであるソフトウェア「Processing」とデバイス「Arduino」を使って、身近にある「電球」を演出する技を会得します。普段お使いの電球照明を好きな調光パターンでコントロールできるほか、パソコンとの組み合わせによるサウンドとの同期や調光パターンのシミュレーションができるようになります。
日 程:2010年8月28日(土) ~ 8月29日(日) (2日間)
定 員:8名(最小実施人数:6名)
会 場:TRUNK -Creative Office Sharing-
〒984-8651 宮城県仙台市若林区卸町二丁目15-2 卸町会館5階
申し込み方法:
氏名、住所、電話番号、e-mailアドレス、参加動機を明記の上、
logue.info@gmail.comへお申込ください。
参加費の入金方法をご連絡します。参加費の入金をもって受付完了とさせていただきます。
申込・入金締切:8月13日(金)
ただし、定員になり次第受付を終了します。
締切後にキャンセルされた場合、参加費の返金は致しません。
また、申込締切日を過ぎて最小実施人数に満たない場合には開講しません。
その場合には申込者へ参加費を返金します。
主 催:logue
講 師:久世祥三 http://www.kuze.jp/mathrax/
会 場:TRUNK -Creative Office Sharing-
お問い合わせ:logue.info@gmail.com
主 催:logue
詳 細:→ http://www.project-logue.jp/]]>

Tokyo Midtown Award 2010応募作品の進捗状況確認
[ 補講内容 ]
1) Tokyo Midtown Award 2010提出作品の進捗状況の確認を行ないます。
[ 次回補講 ]
日 時:2010年8月24日(火) 13:00 ~
会 場:情報デザイン棟 4F 造形研究室
内 容:応募作品の最終確認と応募提出パネルの確認を行ないます。
dachas011 - 「仙台ムーブメントNOW」に参加します。
詳 細:http://dachas.jp/dachas011/
日 時:2010年8月7日(土)19:00〜20:00
場 所:アップルストア仙台一番町
〒980-0811 宮城県仙台市青葉区一番町 3-10-24
参加費:無料
出 演:
片平 裕市(片平堂)/ Rails勉強会@東北・Sendai.js・Scalaコップの会
佐藤 健(陣天.net)/ Sendai.as
菊地 貴公(BUBBLE)/ 仙台デパートメント
酒井 聡(仙台高等専門学校)/ Cultivation・logue
菊地 正宏(仙台経済新聞編集長/モノカキ)/ DTP Booster(Sendai)
佐藤 裕(Bluebeck)/ CSS Nite in SENDAI・dachas
場 所:アップルストア仙台一番町
〒980-0811 宮城県仙台市青葉区一番町 3-10-24
参加費:無料
詳 細:http://dachas.jp/dachas011/]]>

海天学者课程Studio设计
Temporary Event Environments
虚拟建筑环境的构想与实践
中国・大連理工大学にて客員学者をされている山代悟さん(建築家・ビルディングランドスケープ共同主宰
博士(工学)・大連理工大学 建築与芸術学院 海天学者)のお誘いをうけ、7月20日(火) ~ 27日(火)の期間で中国・大連に滞在し、現地学生たちと共同制作・作品発表を行ないます。
大連理工大学:www.dlut.edu.cn/
大連理工大学:www.dlut.edu.cn/]]>
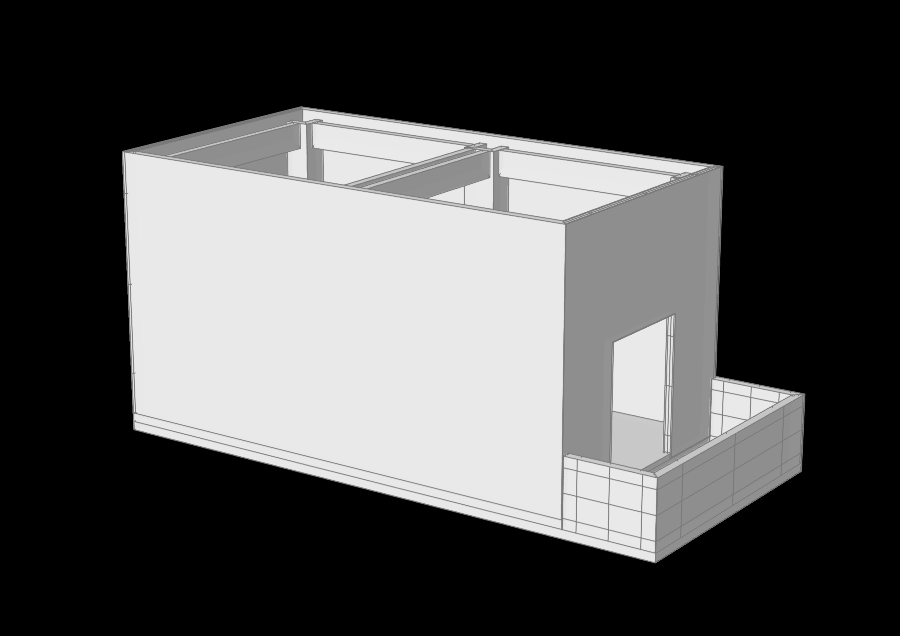
立体モデル制作の基礎的表現技法
[ 本日の授業内容 ]
1) スチレンボードを用いたインテリアモデル制作:エスキースチェック、材料の配布
2) スタイロフォームモデル自由課題の制作:
Tokyo Midtown Award 2010に応募するための各自アイディアをモデルとパネルに仕上げる。
[ インテリアモデル図面 ]
1) 平面図:デザイン演習Ⅰ インテリア課題 平面図
2) 側面図:デザイン演習Ⅰ インテリア課題 側面図
3) 断面図:デザイン演習Ⅰ インテリア課題 断面図
※ 参考資料:図法線について
[ 次週の予定 ]
1) コンペ提出作品の制作:
Tokyo Midtown Award 2010に応募するための各自アイディアをモデルとパネルに仕上げる。
2) インテリアモデルの制作:スチレンボードを用いたインテリアモデルの制作。
インテリアモデルのエスキースチェック(アイディアを考えてくること)
用具の忘れ物は出席とみなしませんので、忘れ物のないよう気をつけましょう。
また、汚れても良い服装で出席してください。
※ 次週22日の授業は、酒井出張のため制作時間とします。
確実に作業を進めていてください。


 ]]>
]]>

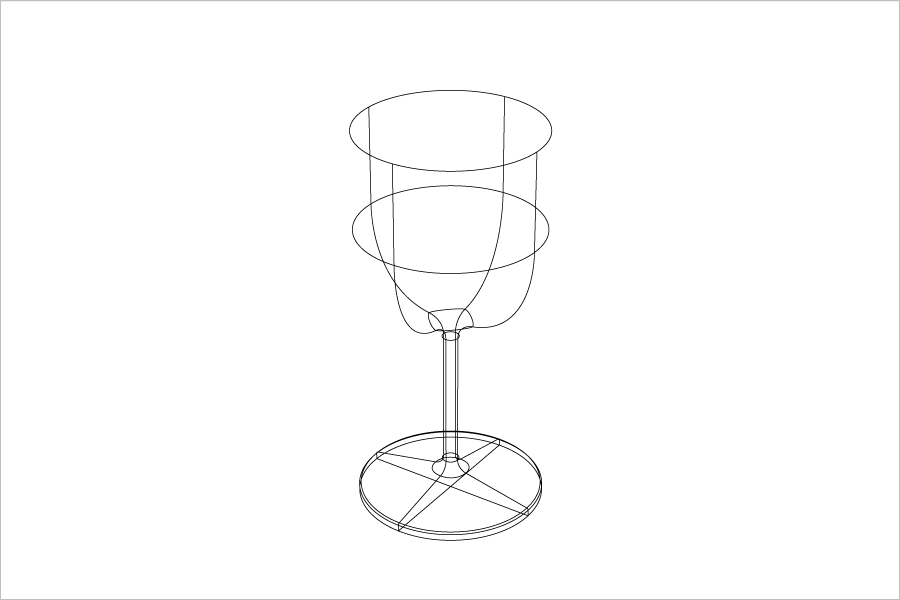
Shadeの基本的な操作の取得
[ 本日の授業内容 ]
1) 開いた線形状・閉じた線形状
2) 回転体の扱い方
3) 掃引体の扱い方
4) 砂時計のモデリング
[ 本日の課題 ]
1) 授業内で取り組んだ「回転体・掃引体」を使用して、
ワイヤーモデルを制作すること。題材は自由とします。
課題プリント:100713snct_cg_homework.pdf
2) 授業内で取り組んだ「砂時計のモデリング」を指定のところまで進めておくこと。
[ 次回の予定 ]
1) 開いた線形状・閉じた線形状、回転体・掃引体の復習
2) 砂時計のモデリング続き
※ 次週 20日(火)は、月曜授業ですので授業はありません。
また、27日(火)は酒井中国出張帰国当日なので、授業に遅れる場合、
もしくは急遽次週となる場合がありますが、
その際には「砂時計のモデリング」を指定のところまで進めておくこと。

立体モデル制作の基礎的表現技法
[ 本日の授業内容 ]
1) スチレンボードを用いたインテリアモデル制作:課題内容の説明、材料の配布
2) スタイロフォームモデル自由課題の制作:
Tokyo Midtown Award 2010に応募するための各自アイディアをモデルとパネルに仕上げる。
[ インテリアモデル図面 ]
1) 平面図:デザイン演習Ⅰ インテリア課題 平面図
2) 側面図:デザイン演習Ⅰ インテリア課題 側面図
3) 断面図:デザイン演習Ⅰ インテリア課題 断面図
※ 参考資料:図法線について
[ 次週の予定 ]
1) コンペ提出作品の制作:
Tokyo Midtown Award 2010に応募するための各自アイディアをモデルとパネルに仕上げる。
2) インテリアモデルの制作:スチレンボードを用いたインテリアモデルの制作。
インテリアモデルのエスキースチェック(アイディアを考えてくること)
用具の忘れ物は出席とみなしませんので、忘れ物のないよう気をつけましょう。
また、汚れても良い服装で出席してください。


 ]]>
]]>
Shadeの基本的な操作の取得
[ 本日の授業内容 ]
1) 三次元立体の扱い方
2) 開いた線形状と閉じた線形状の違い
3) 回転体・掃引体の扱い方
[ 本日の課題 ]
1) 授業内で取り組んだ「開いた線形状・閉じた線形状、回転体・掃引体」を使用して、
ワイヤーモデルを制作すること。題材は自由とします。
課題プリント:100706snct_cg_homework.pdf
[ 次回の予定 ]
1) 開いた線形状・閉じた線形状、回転体・掃引体の復習
2) 砂時計のモデリング

スタイロフォームモデルの制作、アイディアの絞り込みと具現化
[ 本日の授業内容 ]
1) スタイロフォームモデル "Cube" 講評会
2) 以下のテーマについて、これまで提案してきたアイディアの絞り込み。
Tokyo Midtown Award 2010
「On the Green」:街の暮らしならではの、緑を楽しむ様々なライフスタイル
デザインコンペ:http://www.tokyo-midtown.com/jp/award/
[ 次回の予定 ]
1) コンペ提出作品の制作:
Tokyo Midtown Award 2010に応募するための各自アイディアをモデルとパネルに仕上げる。
2) インテリアモデルの制作:スチレンボードを用いたインテリアモデルを制作します。
[ 用 具 ]
ジェッソ、筆など、紙ヤスリ(400番、600番、800番)、新聞紙
加えて、Tokyo Midtown Award 2010応募作品の材料を各自調達し持参すること。
服装は汚れても良い格好でくること。
※用具の忘れ物は出席とみなしませんので、忘れ物のないよう気をつけましょう。

Illustratorの基本操作の取得
[ 本日の授業内容 ]
「CGリテラシー Photoshop & Illustrator CS2 for Windows」 影山 明俊 (著), 栗田 浩司 (著)
を、教科書として用います。
1) IllustratorとPhotoshopの実践的活用:マスコットキャラクターのデザインを制作する。
「島根県立大学マスコットキャラクターデザイン募集」
「島根県立大学憲章」のイメージを反映したマスコットキャラクターデザインを制作。
・色彩は自由。
・モノクロ加工や、縮小加工に対応でき、グッズ製作が可能なもの。
・一人で何点でも応募可。
作品提出締切:2010年7月14日 消印有効
詳細はこちら:http://www.u-shimane.ac.jp/02university/2010-0531-1016-15.html
[ 本日の課題 ]
授業内で取り組んだ「島根県立大学マスコットキャラクターのデザイン」を描き完成させ、印刷して提出。
提出期限:7月6日 授業開始まで
課題プリント:

スタイロフォームモデルの制作、アイディアの絞り込みと具現化
[ 本日の授業内容 ]
1) 立方体の制作:サーフェイサーの塗布・研磨、塗装
2) 以下のテーマについて、前回の授業内で課題としていたアイディアの問題点や
応用発展の可能性などをまとめ、記入してきたアイディアシートの発表
Tokyo Midtown Award 2010
「On the Green」:街の暮らしならではの、緑を楽しむ様々なライフスタイル
デザインコンペ:http://www.tokyo-midtown.com/jp/award/
2-1) 記入したアイディアシートの発表。1名 発表3分間 質疑応答2分間。
[ 次回の予定 ]
1) 立方体の制作:完成
※ A3用紙(横)に制作した立方体の写真(3点以上)を美しくレイアウトして提出
※ 次回7/1の授業は、5-6時限目のみとなります。
[ 用 具 ]
ジェッソ、筆など、紙ヤスリ(400番、600番、800番)、新聞紙
服装は汚れても良い格好でくること。
※用具の忘れ物は出席とみなしませんので、忘れ物のないよう気をつけましょう。

Illustratorの基本操作の取得
[ 本日の授業内容 ]
「CGリテラシー Photoshop & Illustrator CS2 for Windows」 影山 明俊 (著), 栗田 浩司 (著)
を、教科書として用います。
1) IllustratorとPhotoshopの実践的活用:2011年度の年賀状を制作する。
「2011年度 年賀状デザインコンペ とんがりデザイン大募集!!」
2011年度の年賀状のデザインの募集。下記 URLより台紙をダウンロードの上、制作。
・「卯(兎)」をモチーフにした斬新なデザイン
・従来の枠にとらわれない写真やイラストを使用したイメージデザイン
・「挨拶状ドットコム」のテーマである「きずな」をテーマにしたデザイン
※ 一人につき3点まで
作品提出締切:2010年7月9日 必着
詳細はこちら:http://nenga.aisatsujo.jp/compe/
[ 本日の課題 ]
授業内で取り組んだ「2011年度の年賀状」を描き完成させ、印刷して提出。
提出期限:6月29日 授業開始まで
課題プリント:100622snct_cg_homework.pdf

スタイロフォームモデルの制作、アイディアの絞り込みと具現化
[ 本日の授業内容 ]
1) 立方体の制作:サーフェイサーの塗布・研磨、塗装
2) 以下のテーマについてこれまで発案したアイディアの問題点や応用発展の可能性などをまとめ、
アイディアの絞り込みと具現化をはかる。
Tokyo Midtown Award 2010
「On the Green」:街の暮らしならではの、緑を楽しむ様々なライフスタイル
デザインコンペ:http://www.tokyo-midtown.com/jp/award/
2-1) これまでに発案したアイディアから3点を選び出し(新規アイディアでも可)、
指定のアイディアシートを記入。
※ アイディアシート:100617_design.pdf
2-2) 記入したアイディアシートの発表。1名 発表3分間 質疑応答2分間。
[ 次回の予定 ]
1) 立方体の制作:塗装、表面仕上げ
2) 以下のテーマについてアイディアをまとめ上げる。
「On the Green」:街の暮らしならではの、緑を楽しむ様々なライフスタイル
※ 授業で提案をしたアイディアを各自整頓しておくこと。
[ 用 具 ]
ジェッソ、筆など、紙ヤスリ(400番、600番、800番)、新聞紙
服装は汚れても良い格好でくること。
※用具の忘れ物は出席とみなしませんので、忘れ物のないよう気をつけましょう。

スタイロフォームモデルの制作、コンセプトの創出
[ 本日の授業内容 ]
1) 立方体の制作:サーフェイサーの塗布・研磨
2) 以下のテーマについて問題点や応用発展の可能性などを探る。
Tokyo Midtown Award 2010
「On the Green」:街の暮らしならではの、緑を楽しむ様々なライフスタイル
デザインコンペ:http://www.tokyo-midtown.com/jp/award/
[ 次回の予定 ]
1) 立方体の制作:サーフェイサーの塗布・研磨、塗装
2) 以下のテーマについて問題点や応用発展の可能性などを探る。
「On the Green」:街の暮らしならではの、緑を楽しむ様々なライフスタイル
※ 前回までの授業で提案をしたアイディアを各自整頓しておくこと。
[ 用 具 ]
ジェッソ、筆など、紙ヤスリ(400番、600番、800番)、新聞紙
服装は汚れても良い格好でくること。
※用具の忘れ物は出席とみなしませんので、忘れ物のないよう気をつけましょう。
大きな地図で見る
Illustratorの基本操作の取得
[ 本日の授業内容 ]
「CGリテラシー Photoshop & Illustrator CS2 for Windows」 影山 明俊 (著), 栗田 浩司 (著)
を、教科書として用います。
1) Illustratorの実践的活用:地図を描く
下記の内容は必ずテキストボックスを用いてレイアウトすること。
テキスト必須項目:natori_map.pdf
[ 本日の課題 ]
授業内で取り組んだ「仙台高専 名取キャンパス周辺地図」を描き完成させ、印刷して提出。
提出期限:6月22日 授業開始まで
課題プリント:100608snct_cg_homework.pdf
[ 次回の予定 ]
1) Illustratorの実践的活用:キャラクターデザインの作成
[ コンペ紹介 ]
「埼玉県済生会栗橋病院 ロゴマーク・キャラクター募集」
埼玉県済生会栗橋病院というイメージにふさわしい「ロゴマーク」と「イメージキャラクター」の募集。
A4上質紙に、1作品当たり10×10cm程度の大きさ。3色以内。(白黒も可)
作品提出締切:2010年6月30日 当日消印有効
詳細はこちら:http://www.saikuri.org/
「2011年度 年賀状デザインコンペ とんがりデザイン大募集!!」
2011年度の年賀状のデザインの募集。下記 URLより台紙をダウンロードの上、制作。
・「卯(兎)」をモチーフにした斬新なデザイン
・従来の枠にとらわれない写真やイラストを使用したイメージデザイン
・「挨拶状ドットコム」のテーマである「きずな」をテーマにしたデザイン
※ 一人につき3点まで
作品提出締切:2010年7月9日 必着
詳細はこちら:http://nenga.aisatsujo.jp/compe/

 ]]>
]]>